Connect to KWDB Using MyBatis-Plus
MyBatis-Plus is an enhancement of MyBatis that provides numerous convenient features, including conditional constructors, pagination plugins, and code generators, which significantly improve development efficiency.
This section demonstrates how to integrate KWDB with a Maven-managed Spring Boot project using MyBatis-Plus for data access and management. For frequently asked questions about using MyBatis-Plus, see MyBatis and MyBatis-Plus.
This example uses the following tools and frameworks:
- JDK: OpenJDK 1.8.0_402
- Maven: Apache Maven 3.6.3
- Spring Boot: 2.7.18
- MyBatis-Plus: com.baomidou:mybatis-plus-boot-starter:3.5.5
Prerequisites
- OpenJDK 1.8 or higher installed.
- Maven 3.6 or higher installed.
- KaiwuDB JDBC driver package obtained.
- KWDB installed and running with:
- Properly configured database authentication
- A database created for your connection
- A user with appropriate privileges on tables or higher
The following example assumes you have already created a relational database and table structure. If not, run the following SQL commands:
Create the database.
CREATE DATABASE kaiwudb_app;Create the table.
CREATE TABLE IF NOT EXISTS kaiwudb_app.sensor_data (
    id SERIAL PRIMARY KEY,
    sensor_id VARCHAR(20) NOT NULL,
    temperature DOUBLE,
    humidity DOUBLE,
    pressure DOUBLE,
    distance INT,
    description VARCHAR(255),
    is_active BOOLEAN DEFAULT true,
    raw_data BYTEA,
    record_time TIMESTAMP DEFAULT NOW(),
    del_flag CHAR(1)
);
Environment Setup
Initializing the Project
Create a Spring Boot project in IntelliJ IDEA and configure the JDK 8 environment.
Note
The official site defaults to JDK 17 as the minimum version. Change the Server URL to Aliyun: start.aliyun.com, and then set the Java version.
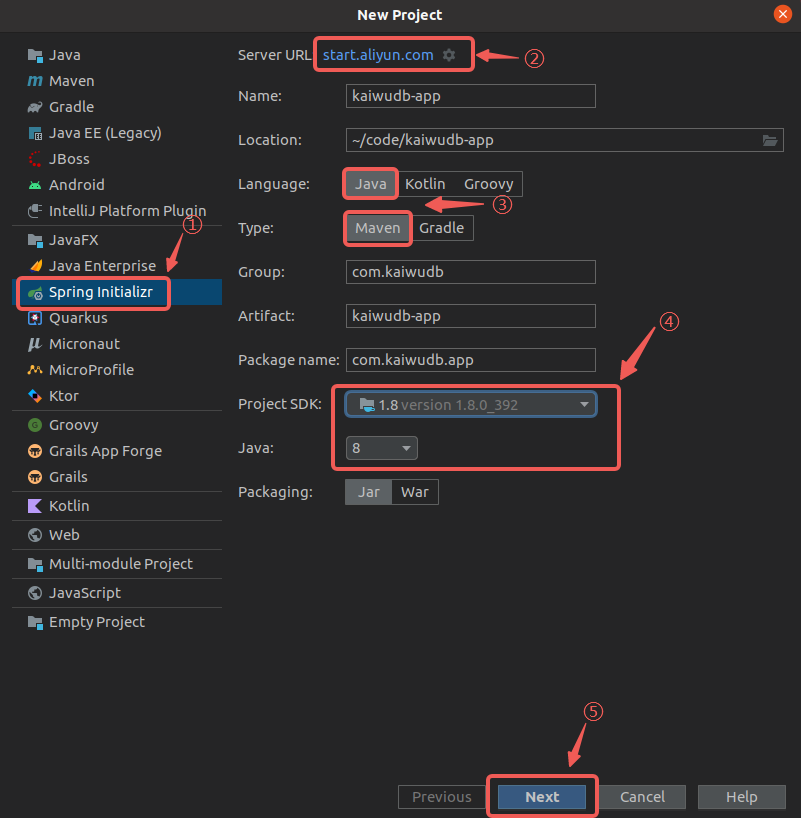
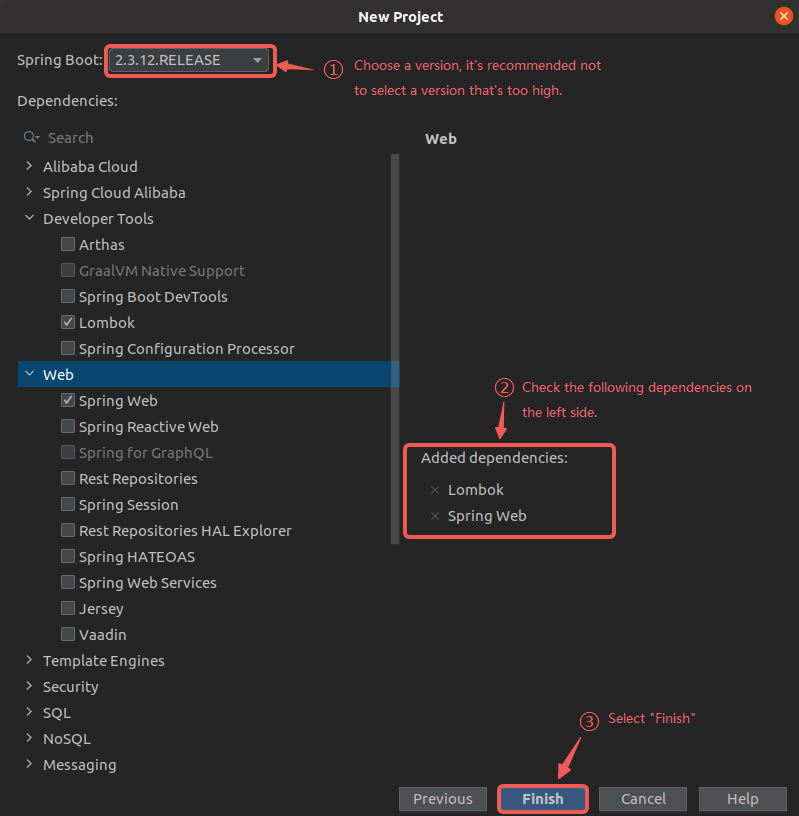
Select the required dependencies and complete project creation.
Rename
application.propertiesin the/src/main/resourcesdirectory toapplication.yml.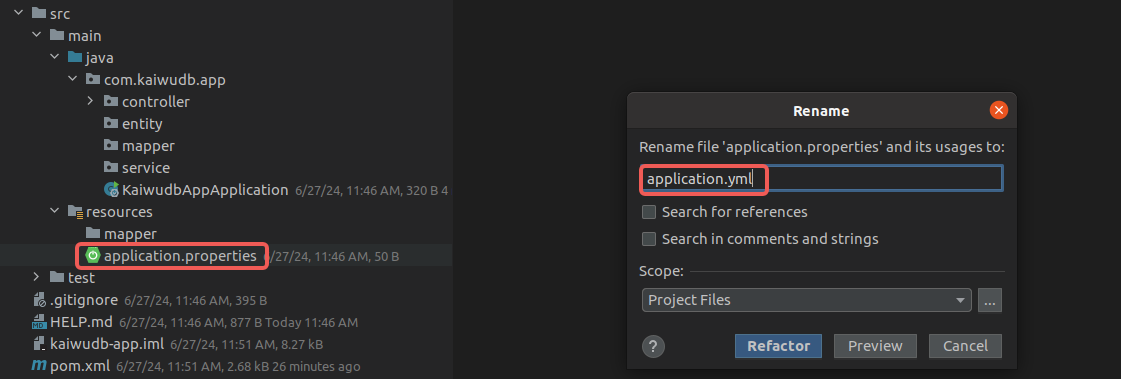
Adding Dependencies
Add the MyBatis-Plus dependency to the
pom.xmlfile.TIP
It is recommended to use MyBatis-Plus version 3.4.3 or higher.
<!--  https://mvnrepository.com/artifact/com.baomidou/mybatis-plus-boot-starter  -->
<dependency>
  <groupId>com.baomidou</groupId>
  <artifactId>mybatis-plus-boot-starter</artifactId>
  <version>3.5.5</version>
</dependency>
Add the KaiwuDB JDBC dependency to the
pom.xmlfile.<!-- KaiwuDB JDBC 2.2.0 --> <dependency> <groupId>com.kaiwudb</groupId> <artifactId>kaiwudb-jdbc</artifactId> <version>3.1.0</version> </dependency>If the KaiwuDB JDBC driver cannot be loaded, run the following command to install it into your local Maven repository:
mvn install:install-file "-Dfile=../kaiwudb-jdbc-3.1.0.jar" "-DgroupId=com.kaiwudb" "-DartifactId=kaiwudb-jdbc" "-Dversion=3.1.0" "-Dpackaging=jar"
Configuring the Connection
Configure the database connection parameters in the
application.ymlfile.spring: datasource: url: jdbc:kaiwudb://127.0.0.1:26257/kaiwudb_app # Database connection URL username: <user_name> # Username for database connection password: <password> # Password for database connection driver-class-name: com.kaiwudb.Driver # JDBC driver class nameIn
application.yml, configure the mapper scan path, global settings, and custom SQL interceptor parameters for MyBatis-Plus.mybatis-plus: configuration: map-underscore-to-camel-case: true # Enable automatic mapping for camel case log-impl: org.apache.ibatis.logging.stdout.StdOutImpl # Enable logging type-aliases-package: com.kaiwudb.app.entity # Entity class package mapper-locations: classpath:mapper/*.xml # Mapper XML file path
Implementing CRUD Operations
The following example uses IoT sensors to demonstrate how to implement Create, Read, Update, and Delete (CRUD) operations.
Creating Entity Class
In the
entitydirectory, create an entity classSensorDatato record sensor data. Add the@Dataand@TableNameannotations to automatically generate methods such asgetter,setter,equals,canEqual,hashCode, andtoString, and specify the corresponding table name in the database:package com.kaiwudb.app.entity; import com.baomidou.mybatisplus.annotation.TableField; import com.baomidou.mybatisplus.annotation.TableName; import lombok.Data; import java.time.LocalDateTime; @Data @TableName("sensor_data") public class SensorData { private Long id; // Primary key, auto-incrementing and unique identifier @TableField("sensor_id") private String sensorId; // Unique identifier for the sensor private Double temperature; // Temperature data from the sensor private Double humidity; // Humidity data from the sensor private Double pressure; // Pressure data from the sensor private Integer distance; // Sensor distance private String description; // Detailed description of the sensor @TableField("is_active") private Boolean active; // Indicates whether the sensor is active @TableField("raw_data") private byte[] rawData; // Raw bytes of sensor data @TableField("record_time") private LocalDateTime recordTime; // Timestamp of data insertion @TableField("del_flag") private String delFlag; // Deletion flag: 0 - not deleted, 1 - deleted }
Creating Mapper Interface
In the
mapperdirectory, createSensorDataMapper, which extends theBaseMapperinterface. Use@Mapperand@Repositoryannotations to implement common operations such as data insertion, update, deletion, and querying:package com.kaiwudb.app.mapper; import com.baomidou.mybatisplus.core.mapper.BaseMapper; import com.kaiwudb.app.entity.SensorData; import org.apache.ibatis.annotations.Mapper; import org.springframework.stereotype.Repository; @Mapper @Repository public interface SensorDataMapper extends BaseMapper<SensorData> { // Custom SQL methods }
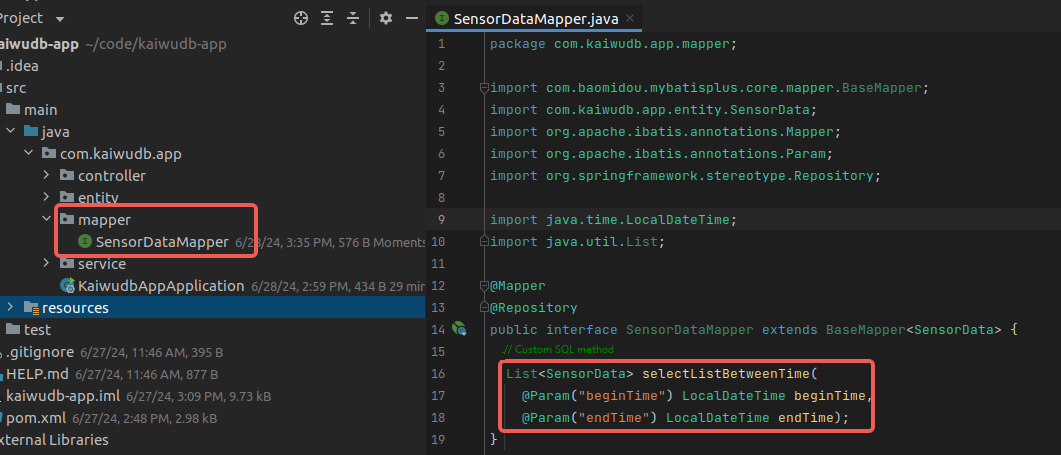
(Optional) Defining Custom SQL Methods
Define custom SQL methods in
SensorDataMapperas needed, for example, to query data byrecord_time:List<SensorData> selectListBetweenTime( @Param("beginTime") LocalDateTime beginTime, @Param("endTime") LocalDateTime endTime);Result:
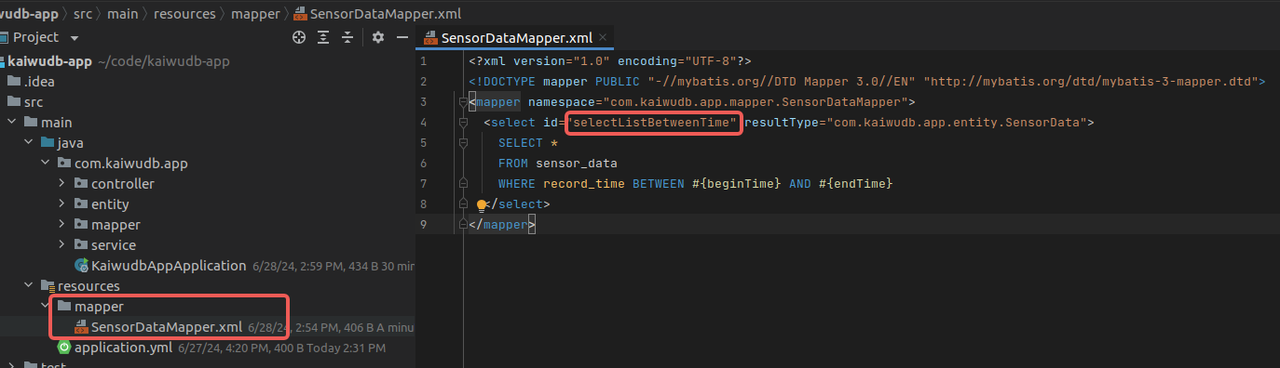
In the
resourcesdirectory, create amapperdirectory and aSensorDataMapper.xmlfile with the following content:Note
The
idin theselecttag corresponds to the SQL methodselectListBetweenTimedefined in the mapper interface.<?xml version="1.0" encoding="UTF-8"?> <!DOCTYPE mapper PUBLIC "-//mybatis.org//DTD Mapper 3.0//EN" "http://mybatis.org/dtd/mybatis-3-mapper.dtd"> <mapper namespace="com.kaiwudb.app.mapper.SensorDataMapper"> <select id="selectListBetweenTime" resultType="com.kaiwudb.app.entity.SensorData"> SELECT * FROM sensor_data WHERE record_time BETWEEN #{beginTime} AND #{endTime} </select> </mapper>Result:
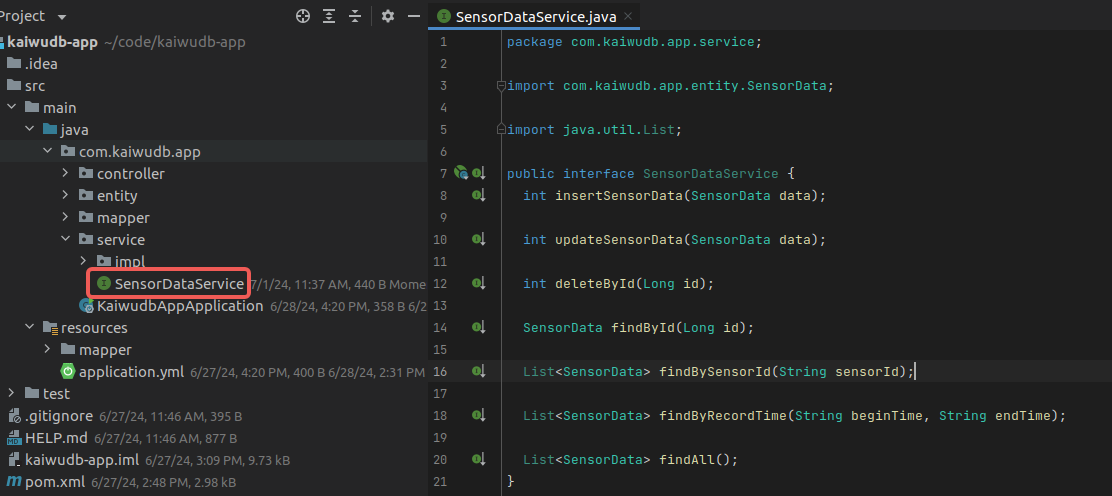
Creating Service Interface and Implementation
In the
servicedirectory, create theSensorDataServiceinterface and its implementation classSensorDataServiceImpl, using the customSensorDataMapperinterface to implement CRUD operations. The query interface supports multiple query methods: by ID, by sensorId, by time range, and querying all data.SensorDataServiceinterface:package com.kaiwudb.app.service; import com.kaiwudb.app.entity.SensorData; import java.util.List; public interface SensorDataService { int insertSensorData(SensorData data); int updateSensorData(SensorData data); int deleteById(Long id); SensorData findById(Long id); List<SensorData> findBySensorId(String sensorId); List<SensorData> findByRecordTime(String beginTime, String endTime); List<SensorData> findAll(); }Result:
SensorDataServiceImplimplementation:package com.kaiwudb.app.service.impl; import com.baomidou.mybatisplus.core.conditions.query.QueryWrapper; import com.kaiwudb.app.entity.SensorData; import com.kaiwudb.app.mapper.SensorDataMapper; import com.kaiwudb.app.service.SensorDataService; import org.springframework.beans.factory.annotation.Autowired; import org.springframework.stereotype.Service; import java.time.LocalDateTime; import java.time.format.DateTimeFormatter; import java.util.List; @Service public class SensorDataServiceImpl implements SensorDataService { @Autowired private SensorDataMapper sensorDataMapper; @Override public int insertSensorData(SensorData data) { return sensorDataMapper.insert(data); } @Override public int updateSensorData(SensorData data) { return sensorDataMapper.updateById(data); } @Override public int deleteById(Long id) { return sensorDataMapper.deleteById(id); } @Override public SensorData findById(Long id) { return sensorDataMapper.selectById(id); } @Override public List<SensorData> findBySensorId(String sensorId) { return sensorDataMapper.selectList(new QueryWrapper<SensorData>().eq("sensor_id", sensorId)); } @Override public List<SensorData> findByRecordTime(String beginTime, String endTime) { LocalDateTime beginDateTime = LocalDateTime.parse(beginTime, DateTimeFormatter.ofPattern("yyyy-MM-dd HH:mm:ss.SSS")); LocalDateTime endDateTime = LocalDateTime.parse(endTime, DateTimeFormatter.ofPattern("yyyy-MM-dd HH:mm:ss.SSS")); return sensorDataMapper.selectListBetweenTime(beginDateTime, endDateTime); } @Override public List<SensorData> findAll() { return sensorDataMapper.selectList(null); } }Result:

Creating Controller
In the
controllerdirectory, create theSensorDataControllerto handle HTTP requests and implement CRUD operations for sensor data:package com.kaiwudb.app.controller; import com.kaiwudb.app.entity.SensorData; import com.kaiwudb.app.service.SensorDataService; import org.springframework.beans.factory.annotation.Autowired; import org.springframework.format.annotation.DateTimeFormat; import org.springframework.web.bind.annotation.DeleteMapping; import org.springframework.web.bind.annotation.GetMapping; import org.springframework.web.bind.annotation.PathVariable; import org.springframework.web.bind.annotation.PostMapping; import org.springframework.web.bind.annotation.PutMapping; import org.springframework.web.bind.annotation.RequestBody; import org.springframework.web.bind.annotation.RequestMapping; import org.springframework.web.bind.annotation.RequestParam; import org.springframework.web.bind.annotation.RestController; import java.util.List; @RestController @RequestMapping("/sensor-data") public class SensorDataController { @Autowired private SensorDataService sensorDataService; @PostMapping("/add") public int addSensorData(@RequestBody SensorData data) { return sensorDataService.insertSensorData(data); } @PutMapping("/update") public int updateSensorData(@RequestBody SensorData data) { return sensorDataService.updateSensorData(data); } @DeleteMapping("/{id}") public int deleteSensorDataById(@PathVariable Long id) { return sensorDataService.deleteById(id); } @GetMapping("/{id}") public SensorData getSensorDataById(@PathVariable Long id) { return sensorDataService.findById(id); } @GetMapping("/by-sensor-id/{sensorId}") public List<SensorData> getSensorDataBySensorId(@PathVariable String sensorId) { return sensorDataService.findBySensorId(sensorId); } @GetMapping("/by-timestamp") public List<SensorData> getSensorDataByRecordTime( @RequestParam("beginTime") @DateTimeFormat(pattern = "yyyy-MM-dd HH:mm:ss.SSS") String beginTime, @RequestParam("endTime") @DateTimeFormat(pattern = "yyyy-MM-dd HH:mm:ss.SSS") String endTime) { return sensorDataService.findByRecordTime(beginTime, endTime); } @GetMapping("/all") public List<SensorData> getAllSensorData() { return sensorDataService.findAll(); } }Result:

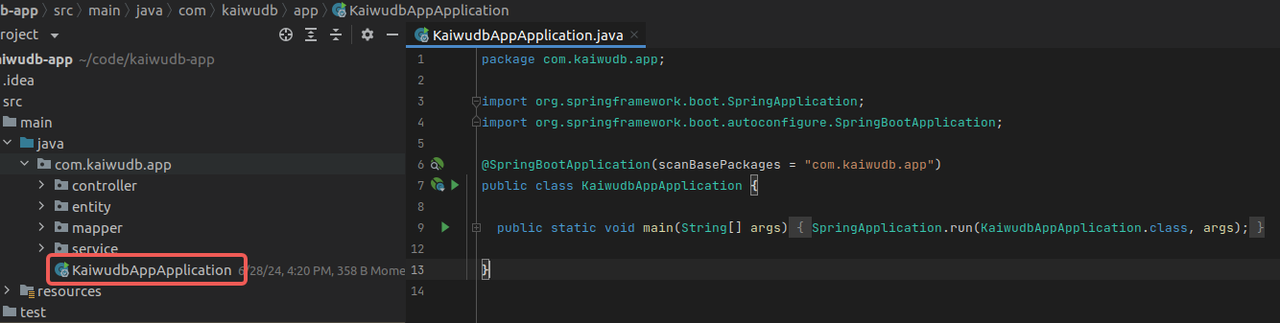
Creating Main Application Class
In the root directory, create the main application class
KaiwudbAppApplicationwith thepublic static void main(String[] args)method to launch the application. Add necessary configuration annotations:package com.kaiwudb.app; import org.springframework.boot.SpringApplication; import org.springframework.boot.autoconfigure.SpringBootApplication; @SpringBootApplication(scanBasePackages = "com.kaiwudb.app") public class KaiwudbAppApplication { public static void main(String[] args) { SpringApplication.run(KaiwudbAppApplication.class, args); } }Result:
Launching the Application
In the project, locate the main application class
KaiwudbAppApplication, right-click on it, and selectRun 'KaiwudbAppApplication'to start the application: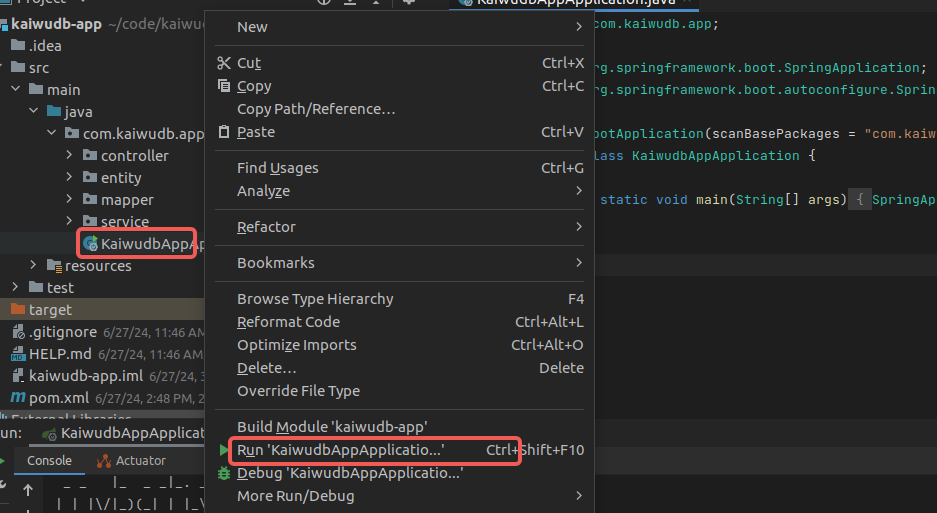
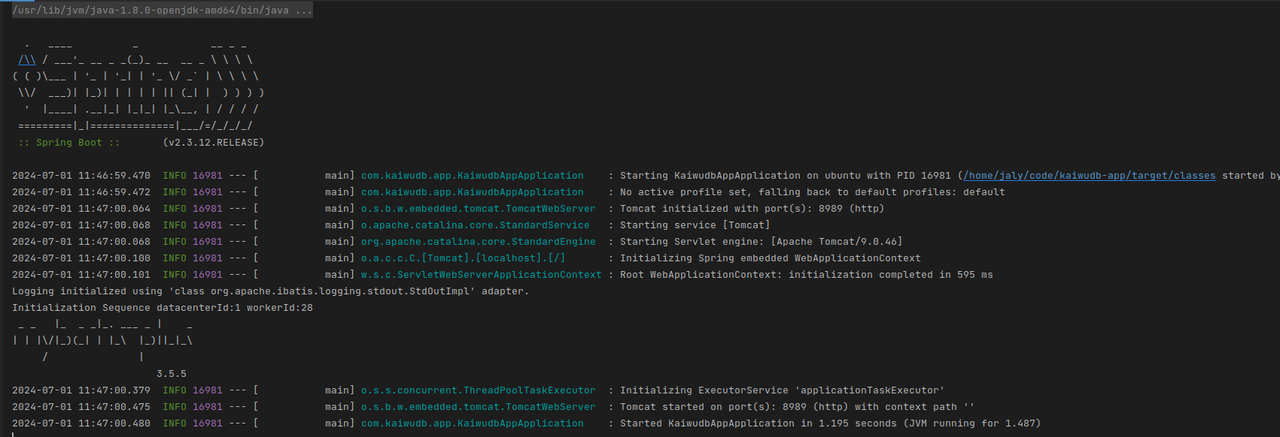
Upon successful startup, the console will display:
Testing API Operations
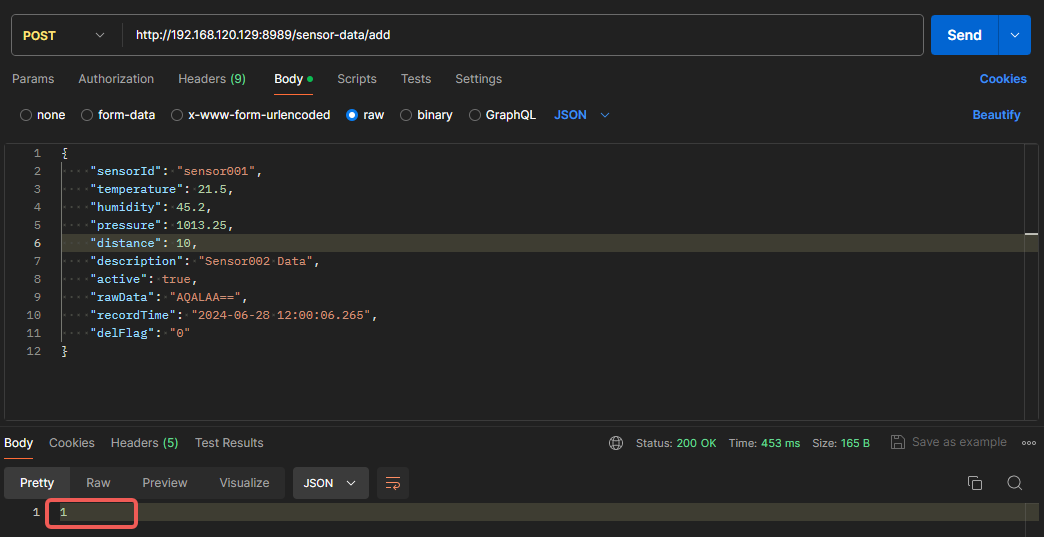
After starting the application, you can use tools like Postman to send HTTP requests and perform CRUD operations on the KWDB database:
Add Data:
Example showing successful insertion of one record:
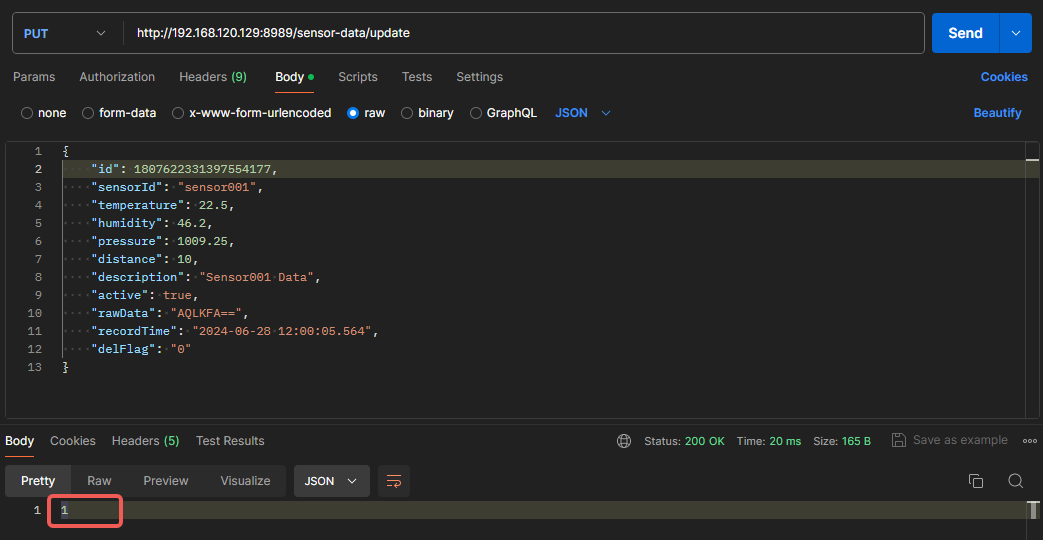
Update Data:
Example showing successful update of one record:
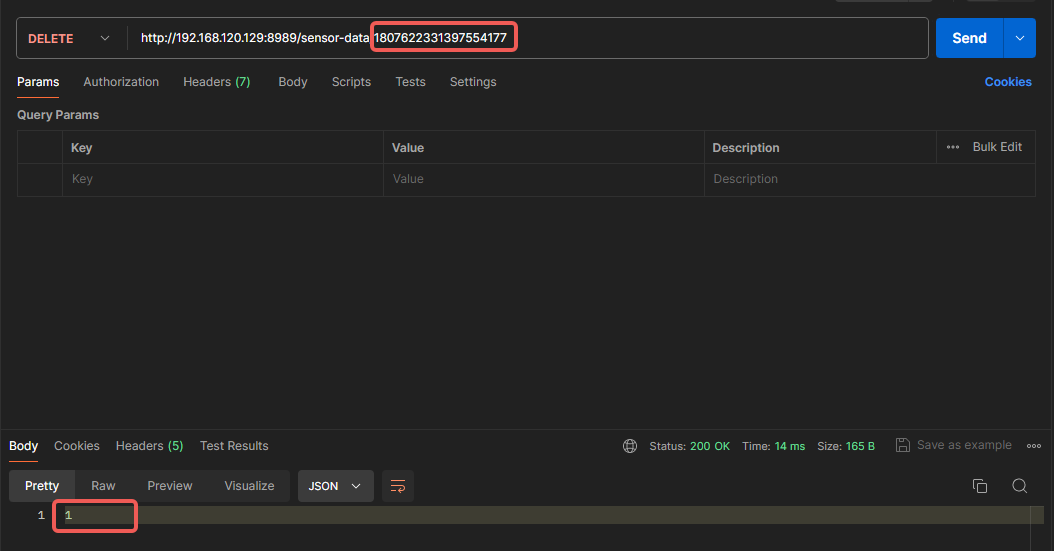
Delete Data:
Example showing successful deletion of one record:
Query Data:
Query by sensorId:
Example showing all records with
sensorId=sensor002:
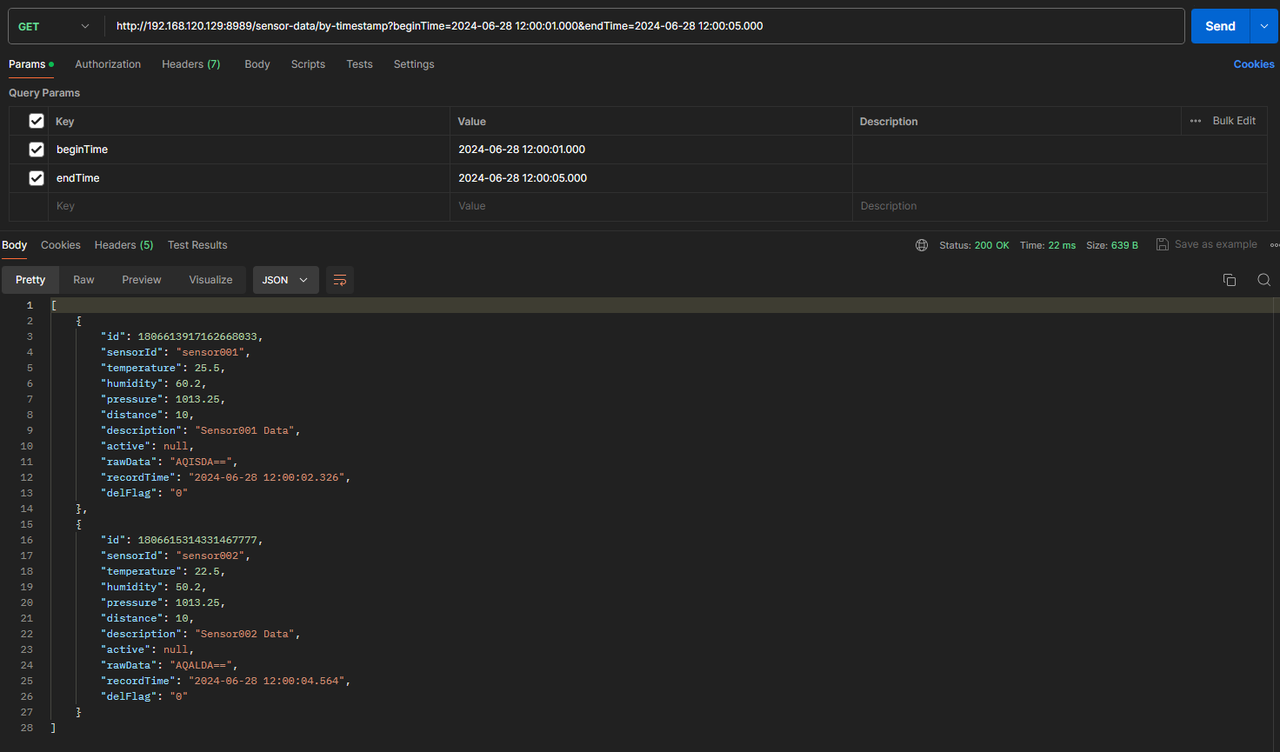
Query by time range:
Example showing all records within the specified time range: