DRBD-based High Availability Solution
IoT business scenarios require extremely high database availability. When hardware failures occur or scheduled maintenance is needed, the system must quickly switch to a backup machine to ensure continuous business operations—continuously receiving data from devices and monitoring their operating status. A robust high availability solution is essential to meet these business continuity requirements.
When evaluating business continuity capabilities, two critical metrics must be considered:
- RTO (Recovery Time Objective): The time required for the system to resume providing services after a planned or unplanned downtime event. For example, RTO=0 means zero business interruption during a downtime event, while RTO=1 minute means the system can resume operations within 1 minute.
- RPO (Recovery Point Objective): The amount of data potentially lost during downtime, typically measured in seconds. For example, RPO=0 means no data loss, while RPO=1 second means users may lose at most the last second of data before shutdown.
Ideally, systems should achieve RTO=0 and RPO=0, meaning business operations continue without interruption or data loss under any circumstances. However, this requires careful consideration of hardware redundancy, additional software components, and increased resource usage during system design.
A more realistic approach is to align your high availability solution with actual business needs by setting reasonable RTO and RPO targets. KWDB recommends establishing separate targets for planned and unplanned scenarios. Since responding to unplanned downtime is more costly—though far less frequent than planned maintenance—you can set stricter RTO and RPO metrics for planned downtime while allowing more flexibility for unplanned events.
High availability solutions typically comprise several key technical components: system monitoring and health checks, cluster high availability strategy management, cluster resource orchestration, automation script execution, and data replication. Among these, data replication is the most fundamental component. For KWDB, minimizing data loss through robust replication technology is the primary objective.
KWDB cluster deployments provide built-in high availability with automatic failover and strong data consistency. For more information, see Multi-Replica Cluster High Availability.
For single-node deployments, KWDB leverages DRBD (Distributed Replicated Block Device), an open-source solution that handles data replication between primary and secondary nodes. System monitoring and health checks are managed by Pacemaker, one of the most successful open-source high availability projects in the Linux-HA ecosystem. Pacemaker uses heartbeat services and cluster communication to build high availability clusters that continuously monitor resource status and orchestrate instance migration and failover operations.
Solution Architecture
The architecture of the DRBD-based high availability solution is shown below:
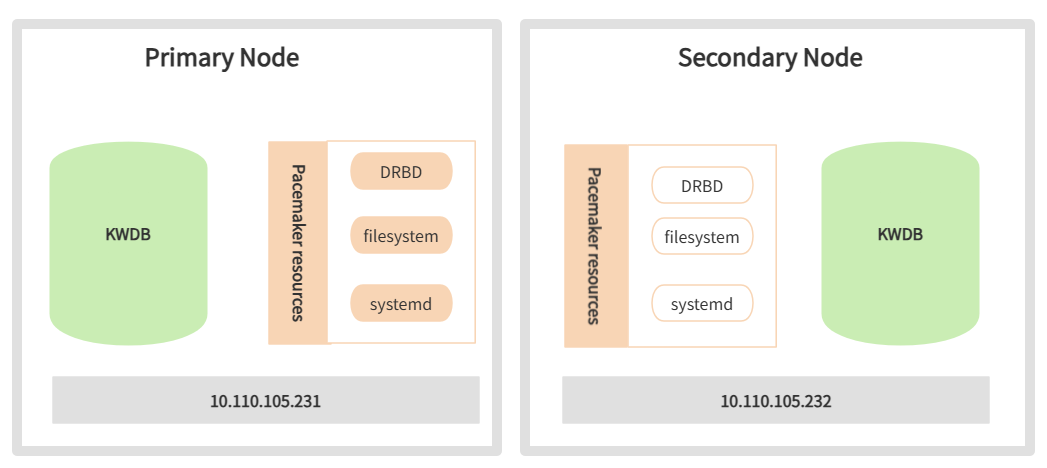
Key technical considerations:
- Each primary and secondary node uses a block device of equal capacity for DRBD replication.
- Primary and secondary nodes must share identical deployment configurations, including the same user data directory specified by
data_rootin thedeploy.cfgfile. - The DRBD device is mounted to the user data directory, with data replicated synchronously through DRBD.
- CA certificates and other files outside the user data directory must be manually copied from the primary to the secondary node (not required for in-secure deployments).
- KWDB startup and shutdown are managed through
systemdservices. - Pacemaker manages DRBD devices, file systems, and
systemdservices as cluster resources, monitoring their status and controlling operations.
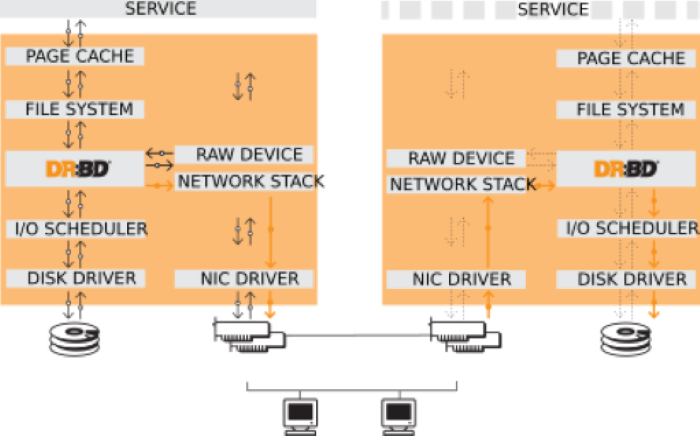
Technology Introduction
Distributed Replicated Block Device (DRBD) is a software-based, shared-nothing replication storage solution that mirrors block devices (hard disks, partitions, logical volumes, etc.) between hosts.
DRBD has the following characteristics:
- Real-time replication: Data is replicated continuously as applications modify it.
- Transparent operation: Applications don't need to know that data is stored across multiple hosts.
- Flexible replication modes: DRBD supports both synchronous and asynchronous replication. In synchronous mode, applications receive write completion notifications only after all connected hosts complete the write. In asynchronous mode, applications receive notifications when local writes complete (typically before data is transmitted to other nodes).
KWDB's primary-secondary high availability solution prioritizes rapid failover within a data center over remote disaster recovery. Therefore, we recommend synchronous replication protocols to maintain data consistency across nodes.
Deployment Preparation
Environment Requirements
In addition to meeting the standard KWDB environment requirements for installation, the DRBD-based high availability solution requires:
- Network: Gigabit or 10-Gigabit Ethernet
- DRBD: version 9.11.0
- Pacemaker: version 2.0.3
Configure IP Addresses and Hostnames
Steps:
Configure the IP addresses and hostnames of the primary and secondary nodes in the
/etc/hostsfile on each node.Example:
your-master-host-ip   ha-node01
your-backup-host-ip   ha-node02
Configure Passwordless SSH Login
Steps:
Log in to the primary node and generate a public-private key pair:
ssh-keygen -f ~/.ssh/id_rsa -N ""Parameters:
-f: The key pair filename.-N: The key password. Set to empty for passwordless login.
Distribute the public key to the secondary node:
ssh-copy-id -f -i ~/.ssh/id_rsa.pub -o StrictHostKeyChecking=no <secondary_node>Verify passwordless login from the primary node to the secondary node:
ssh <secondary_node>Log in to the secondary node and configure passwordless SSH login to the primary node using the same method.
Disable Related Services
Steps:
Check the
/bin/shfile:ls -al /bin/shReconfigure the
dashshell on both nodes, selectingno:sudo dpkg-reconfigure dashStop and disable the
multipathd.socket,multipath-tools, andmultipathservices on both nodes:systemctl stop multipathd.socket systemctl disable multipathd.socket systemctl stop multipath-tools.service systemctl disable multipath-tools.service systemctl stop multipath systemctl disable multipath
Deployment
This section uses Ubuntu 20.04, DRBD 9.11.0, Pacemaker 2.0.3, and pcs 0.10.4 to demonstrate the deployment process.
Command formats may vary when using different versions of Linux, DRBD, or Pacemaker.
Set Up the Pacemaker Cluster
Prerequisites:
- Both nodes are in the same subnet, and an unassigned IP address is available for the virtual IP (VIP).
- Both nodes have NTP time synchronization configured. Tip: Use the chrony package for NTP setup.
- Passwordless SSH authentication is set up between the nodes.
Steps:
Install Pacemaker, corosync, and pcs packages on both nodes. The installation automatically creates the
haclusteruser.apt install pacemaker corosync pcsSet up user authorization:
Set a password for the
haclusteruser on both nodes:passwd haclusterOn any node, remove the default cluster created during installation:
pcs cluster destroyOn any node, authorize cluster management and enter password when prompted:
pcs host auth <primary_node> <secondary_node> -u haclusterExample:
pcs host auth ha-node01 ha-node02 -u hacluster
On any node, create and start the cluster:
pcs cluster setup <cluster_name> <primary_node> <secondary_node> --start --enable --forceParameters:
cluster_name: Cluster name.primary_node: Hostname of the primary node.secondary_node: Hostname of the secondary node.--start: Start the cluster immediately.--enable: Enable automatic startup on boot.--force: Remove previous cluster configurations.
Example output:
root@ha-node01:~# pcs cluster setup ha-cluster ha-node01 ha-node02 --start --enable --force
No addresses specified for host 'ha-node01', using 'ha-node01'
No addresses specified for host 'ha-node02', using 'ha-node02'
Destroying cluster on hosts: 'ha-node01','ha-node02'...
ha-node01: Successfully destroyed cluster
ha-node02: Successfully destroyed cluster
Requesting remove 'pcsd settings' from 'ha-node01','ha-node02'
ha-node01: successful removal of the file 'pcsd settings'
ha-node02: successful removal of the file 'pcsd settings'
Sending 'corosync authkey', 'pacemaker authkey' to 'ha-node01','ha-node02'
ha-node01: successful distribution of the file 'corosync authkey'
ha-node01: successful distribution of the file 'pacemaker authkey'
ha-node02: successful distribution of the file 'corosync authkey'
ha-node02: successful distribution of the file 'pacemaker authkey'
Sending 'corosync.conf' to 'ha-node01','ha-node02'
ha-node01: successful distribution of the file 'corosync.conf'
ha-node02: successful distribution of the file 'corosync.conf'
Cluster has been successfully set up.
Enabling cluster on hosts:'ha-node01','ha-node02'...
ha-node01: Cluster enabled
ha-node02: Cluster enabled
Starting cluster on hosts: 'ha-node01','ha-node02'...
On any node, disable STONITH and configure quorum policy for two-node operation:
pcs property set stonith-enabled=false
pcs property set no-quorum-policy=ignore
On any node, verify cluster status:
pcs statusExample output:
root@ha-node01:~# pcs status
Cluster name: ha-cluster
Cluster Summary:
   * Stack: corosync
   * Current DC: ha-node01 (version 2.0.4-4b1f869f0f) - partition with quorum
   * Last updated: Tue Sep 26 03:49:28 2023
   * Last change: Tue Sep 26 03:48:20 2023 by root via cibadmin on ha-node01
   * 2 nodes configured
   * 0 resource instances configured

Node List:
   * Online: [ ha-node01 ha-node02 ]

Full List of Resources:
   * No resources

Daemon Status:
   corosync: active/enabled
   pacemaker: active/enabled
   pcsd: active/enabled
On any node, create the virtual IP resource (ClusterIP):
pcs resource create ClusterIP ocf:heartbeat:IPaddr2 ip=<virtual_ip_address> cidr_netmask=24 op monitor interval=30sParameters:
virtual_ip_address: The virtual IP address to use.
(Optional) Verify the resource was created successfully:
pcs resourceExample output:
root@ha-node01:/etc# pcs resource
ClusterIP      (ocf::heartbeat:IPaddr2):       Started ha-node01
(Optional) Use
arp -vnto verify the virtual IP's MAC address matches the primary node's network interface.On any node, test resource migration by simulating a failover. Pacemaker will automatically migrate ClusterIP to the secondary node.
Put the primary node in standby:
pcs node standby <primary_node>After migration completes, restore the primary node:
pcs node unstandby <primary_node>
(Optional) Verify resource migration:
pcs resourceExample output:
root@ha-node02:~# pcs resource
ClusterIP      (ocf::heartbeat:IPaddr2):       Started ha-node02
Establish DRBD Replication
Prerequisites:
Block devices of equal capacity (hard disks, partitions, or logical volumes) are prepared on both nodes.
If using disks or disk partitions (e.g.,
/dev/sdd), obtain the stable identifier from/dev/disk/by-id/using theudevadm infocommand, as disk names may change after system restarts.udevadm info /dev/sdd ... E: DEVLINKS= .../dev/disk/by-id/scsi-36f80f41ffaf5a00028e0acde21f326ff E: TAGS=:systemd:
Steps:
Install DRBD software on both nodes:
Note
When prompted, select "No configuration" for the configuration type.
apt install drbd-utilsConfigure DRBD parameters on both nodes:
Navigate to the DRBD configuration directory:
cd /etc/drbd.dEdit the
global_common.conffile to define DRBD's global and default parameters.Example:
# DRBD is the result of over a decade of development by LINBIT.
# In case you need professional services for DRBD or have
# feature requests visit http://www.linbit.com

global {
        usage-count no;
        # minor-count dialog-refresh disable-ip-verification
        # cmd-timeout-short 5; cmd-timeout-medium 121; cmd-timeout-long 600;
}

common {
        protocol C;

        handlers {
                # These are EXAMPLE handlers only.
                # They may have severe implications,
                # like hard resetting the node under certain circumstances.
                # Be careful when choosing your poison.

                # pri-on-incon-degr "/usr/lib/drbd/notify-pri-on-incon-degr.sh; /usr/lib/drbd/notify-emergency-reboot.sh; echo b > /proc/sysrq-trigger ; reboot -f";
                # pri-lost-after-sb "/usr/lib/drbd/notify-pri-lost-after-sb.sh; /usr/lib/drbd/notify-emergency-reboot.sh; echo b > /proc/sysrq-trigger ; reboot -f";
                # local-io-error "/usr/lib/drbd/notify-io-error.sh; /usr/lib/drbd/notify-emergency-shutdown.sh; echo o > /proc/sysrq-trigger ; halt -f";
                # fence-peer "/usr/lib/drbd/crm-fence-peer.sh";
                # split-brain "/usr/lib/drbd/notify-split-brain.sh root";
                # out-of-sync "/usr/lib/drbd/notify-out-of-sync.sh root";
                # before-resync-target "/usr/lib/drbd/snapshot-resync-target-lvm.sh -p 15 -- -c 16k";
                # after-resync-target /usr/lib/drbd/unsnapshot-resync-target-lvm.sh;
        }

        startup {
                # wfc-timeout degr-wfc-timeout outdated-wfc-timeout wait-after-sb
        }

        options {
                # cpu-mask on-no-data-accessible
        }

        disk {
                # size on-io-error fencing disk-barrier disk-flushes
                # disk-drain md-flushes resync-rate resync-after al-extents
                # c-plan-ahead c-delay-target c-fill-target c-max-rate
                # c-min-rate disk-timeout
                on-io-error detach;
                no-disk-flushes;
                no-md-flushes;
        }

        net {
                # protocol timeout max-epoch-size max-buffers
                # connect-int ping-int sndbuf-size rcvbuf-size ko-count
                # allow-two-primaries cram-hmac-alg shared-secret after-sb-0pri
                # after-sb-1pri after-sb-2pri always-asbp rr-conflict
                # ping-timeout data-integrity-alg tcp-cork on-congestion
                # congestion-fill congestion-extents csums-alg verify-alg
                # use-rle
                sndbuf-size 512k;
                max-buffers 8000;
                max-epoch-size 8000;
                unplug-watermark 1024;
                cram-hmac-alg "sha1";
                shared-secret "justaverificationtest";
                #after-sb-0pri disconnect;
                #after-sb-1pri disconnect;
                #after-sb-2pri disconnect;
                after-sb-0pri discard-zero-changes;
                after-sb-1pri discard-secondary;
                after-sb-2pri disconnect;
                rr-conflict   disconnect;
        }

        syncer {
                rate 330M;
                al-extents 517;
                verify-alg crc32c;
        }
}
Create a resource configuration file (e.g.,
drbd3.res) to define the replicated block device:Example:
resource drbd3 {     ## Must match the filename
        on ha-node01 {     ## Primary node hostname
        device /dev/drbd3;    ## Custom device name
        disk /dev/sde;     ## Disk identifier for synchronization
        address your-primary-host-ip:port;    ## Primary node IP address
        meta-disk internal;
        }
        on ha-node02 {    ## Secondary node hostname
        device /dev/drbd3;    ## Custom device name
        disk /dev/sde;      ## Disk identifier for synchronization
        address your-secondary-host-ip:port;    ## Secondary node IP address
        meta-disk internal;
        }
}
Initialize metadata on both nodes:
Example:
drbdadm create-md drbd3
drbdadm adjust all
On the primary node, start initial replication. This initiates data synchronization, which may take considerable time depending on storage size.
Warning
This command overwrites all data on the secondary node. Only execute during initial setup. :::
drbdadm -- --overwrite-data-of-peer primary drbd3(Optional) Monitor replication progress.
Example:
drbdadm status drbd3Example output during replication:
root@ha-node01:/etc/drbd.d# drbdadm status drbd3
drbd3 role:Secondary
   disk:Inconsistent
   peer role:Primary
replication:SyncTarget peer-disk:UpToDate done:24.90

root@ha-node02:/etc/drbd.d# drbdadm status drbd3
drbd3 role:Primary
   disk:UpToDate
   peer role:Secondary congested:yes
replication:SyncSource peer-disk:Inconsistent done:25.28
Example output when complete:
root@ha-node01:/etc/drbd.d# drbdadm status drbd3
drbd3 role:Secondary
   disk:UpToDate
   peer role:Primary
replication:Established peer-disk:UpToDate

root@ha-node02:/etc/drbd.d# drbdadm status drbd3
drbd3 role:Primary
   disk:UpToDate
   peer role:Secondary
replication:Established peer-disk:UpToDate
After replication completes, create a file system on the primary node's block device. Once created, you can mount and use the file system.
Example:
mkfs.ext4 /dev/drbd3
Deploy the High Availability Environment
Create the database directory on both nodes.
Example:
mkdir -p /var/lib/kaiwudbMount the file system on the active resource node.
Example:
mount /dev/drbd3 /var/lib/kaiwudbOn any node, create DRBD resources in the Pacemaker cluster for unified management.
Example:
pcs resource create KaiwuData ocf:linbit:drbd drbd_resource="drbd3" op monitor interval=10s #Create resource named KaiwuData, specify DRBD resource name as drbd3, monitor every 10 seconds
pcs resource promotable KaiwuData promoted-max=1 promoted-node-max=1 clone-max=2 clone-node-max=1 notify=true #Enable resource mobility, specify promotable and cloneable node counts
pcs resource refresh KaiwuData #Refresh resource status
On any node, verify DRBD resource status in the Pacemaker cluster.
Note
If the resource status appears incorrect, check DRBD status using
drbdadm status. If issues persist, restart the DRBD service withsystemctl restart drbd.Example output:
pcs resource
* Clone Set: KaiwuData-clone [KaiwuData] (promotable):
* Promoted: [ ha-node02 ]
* Stopped: [ ha-node01 ]
On any node, define the Filesystem resource and its dependencies. Pacemaker will manage mount operations during failover.
Example:
pcs resource create KaiwuFS ocf:heartbeat:Filesystem device="/dev/drbd3" directory="/var/lib/kaiwudb" fstype="ext4" # Create filesystem resource named KaiwuFS
pcs constraint colocation add KaiwuFS with KaiwuData-clone INFINITY with-rsc-role=Master # Add colocation constraint
pcs constraint order promote KaiwuData-clone then start KaiwuFS # Add startup order constraint
Install KWDB on the secondary node:
Verify the secondary node is currently active for DRBD and Filesystem resources. If the primary node is active, migrate resources first:
Put the primary node in standby:
pcs node standby <primary_node>After migration completes, restore the primary node:
pcs node unstandby <primary_node>
Deploy KWDB. For detailed instructions, see Single-node Script Deployment.
Warning
- Set the
data_rootparameter in thedeploy.cfgfile to match the KaiwuFS filesystem directory. - After installation, delete all files in
data_root—they'll be replicated from the primary node via DRBD.
- Set the
Install KWDB on the primary node:
Ensure the primary node is active for DRBD and Filesystem resources.
Deploy KWDB using the same instructions as Step 6.
Configure the certificate to allow access from the secondary node IP and VIP.
Note
Skip this step if using in-secure deployment.
Delete the existing
node.crtandnode.keyfiles in the/etc/kaiwudb/certsdirectory.Generate a new certificate that includes the secondary node and virtual IP addresses:
kwbase cert create-node <primary_node_ip> <secondary_node_ip> <virtual_ip> 127.0.0.1 0.0.0.0 localhost --certs-dir=/etc/kaiwudb/certs --ca-key=ca.keyCopy certificates to the secondary node:
scp /etc/kaiwudb/certs/* ha-node02:/etc/kaiwudb/certs/
On any node, define the KWDB database resource and its dependencies in Pacemaker:
Example:
pcs resource create KaiwuDB systemd:kaiwudb.service op monitor on-fail=restart #Create new resource
pcs resource defaults migration-threshold=2 #Set resource defaults
pcs resource meta KaiwuDB failure-timeout=10s #Set resource metadata
pcs constraint colocation add KaiwuDB with KaiwuFS INFINITY #Set colocation constraint
pcs constraint order start KaiwuFS then start KaiwuDB #Set startup order constraint
pcs resource group add KaiwuDBGrp KaiwuFS KaiwuDB #Create resource group for unified management
On any node, link the virtual IP to the database resource:
Example:
pcs constraint colocation add ClusterIP with KaiwuDB INFINITYOn any node, verify the cluster setup.
Check cluster status using
pcs status:Example output:
root@ha-node01: ~# pcs status
Cluster name: ha-cluster
Cluster Summary:
* Stack: corosync
* Current DC: ha-node01 (version 2.0.3-4b1f869fof) - partition with quorum
* Last updated: Mon Jul 1 16:15:01 2024
* Last change: Mon Jul 1 10:58:57 2024 by root via cibadmin on ha-node02
* 2 nodes configured
* 5 resource instances configured

Node List:
* Online: [ ha-node01 ha-node02 ]

Full List of Resources:
* ClusterIP (ocf::heartbeat:IPaddr2):   Started ha-node01
* Clone Set: KaiwuData-clone [KaiwuData] (promotable):
* Masters: [ ha-node01 ]
* Slaves: [ ha-node02 ]
* Resource Group: KaiwuDBGrp:
* KaiwuFS (ocf::heartbeat:Filesystem): Started ha-node01
* KaiwuDB (systemd:kaiwudb.service):  Started ha-node01

Daemon Status:
corosync: active/enabled
pacemaker: active/enabled
pcsd: active/enabled
Verify resource dependencies using
pcs constraint. For more Pacemaker commands, see the Pacemaker Documentation.
Solution Verification
Steps:
Connect to KWDB. For instructions, see Connect to KWDB.
Test basic database operations: create, read, update, and delete.
Simulate a failover by putting the primary node in standby:
pcs node standby <primary_node>Wait about 40 seconds, then check cluster status:
Example output:
root@ha-node01: ~# pcs status
Cluster name: ha-cluster
Cluster Summary:
* Stack: corosync
* Current DC: ha-node01 (version 2.0.3-4b1f869fof) - partition with quorum
* Last updated: Mon Jul 1 16:15:01 2024
* Last change: Mon Jul 1 10:58:57 2024 by root via cibadmin on ha-node02
* 2 nodes configured
* 5 resource instances configured

Node List:
* Online: [ ha-node02 ]

Full List of Resources:
* ClusterIP (ocf::heartbeat:IPaddr2):   Started ha-node02
* Clone Set: KaiwuData-clone [KaiwuData] (promotable):
* Masters: [ ha-node02 ]
* Stopped: [ ha-node01 ]
* Resource Group: KaiwuDBGrp:
* KaiwuFS (ocf::heartbeat:Filesystem): Started ha-node02
* KaiwuDB (systemd:kaiwudb.service):  Started ha-node02

Daemon Status:
corosync: active/enabled
pacemaker: active/enabled
pcsd: active/enabled
Bring the primary node back online:
Example:
pcs node unstandby ha-node01(Optional) Check cluster status again:
Example output:
root@ha-node01: ~# pcs status
Cluster name: ha-cluster
Cluster Summary:
* Stack: corosync
* Current DC: ha-node01 (version 2.0.3-4b1f869fof) - partition with quorum
* Last updated: Mon Jul 1 16:15:01 2024
* Last change: Mon Jul 1 10:58:57 2024 by root via cibadmin on ha-node02
* 2 nodes configured
* 5 resource instances configured

Node List:
* Online: [ ha-node01 ha-node02 ]

Full List of Resources:
* ClusterIP (ocf::heartbeat:IPaddr2):   Started ha-node02
* Clone Set: KaiwuData-clone [KaiwuData] (promotable):
* Masters: [ ha-node02 ]
* Slaves: [ ha-node01 ]
* Resource Group: KaiwuDBGrp:
* KaiwuFS (ocf::heartbeat:Filesystem): Started ha-node02
* KaiwuDB (systemd:kaiwudb.service):  Started ha-node02

Daemon Status:
corosync: active/enabled
pacemaker: active/enabled
pcsd: active/enabled
Connect to the database via the secondary node.
Run database operations and verify no data loss occurred during failover.
Switch back to the primary node and verify all data is intact.
Appendix
Common Pacemaker Commands
Cluster management
Create cluster:
pcs cluster setup <cluster_id> ...Destroy cluster:
pcs cluster destroy <cluster_id>
Node management:
Put node in standby:
pcs node standby <node_id>Bring node online:
pcs node unstandby <node_id>
Resource management
Create resource:
pcs resource create <resource_id> ...Remove resource:
pcs resource remove <resource_id>
Constraint management
Configure resource dependencies:
pcs constraint colocation ...
Common DRBD Commands
Using drbdadm
Initialize replication (overwrites all data on secondary node):
drbdadm -- --overwrite-data-of-peer primary <resource_id>Check DRBD status:
drbdadm status <resource_id>
Monitor with drbdmon
drbdmon